Documentation
Introduction
This
Documentation describes starting android development from scratch. If your pc
is already set up for android development, you can skip Paragraph 2 and 3.
Content:
1. Generating
-Downloading & installing
-Adding to path
-Changing assets
-Adding the libraries
-Importing
-Error solving
5. Compiling
6. Publishing
1. Generating
The first step is generating your custom template.
This is the easiest step since your only have to fill
in a form.
First, go to the portal and open your app (or create
an new app).
The data you will have to enter:
- App's name
This is the applications name - App's weburl
This is the url that your application will load (homepage). - App's theme color
Theme color of your apps application bar and dialog title background.
The things you can add (extra's):
- Admob
advertisements
Advertising below your webview to make money. - Analytics tracking
Detailed statistics of your app, how many installations a day, which day do most users use your app, etc. - Parse push notifications (and Parse tracking)
Give your users updates about what's happening, "We have uploaded some great new content" etc.
Detailed information about how to set up these
"extra's" are below the form in a dropdown on the same tab.
After you have generated your application, return to
this documentation for the next step.
After you have generated you template, extract your sherdle-template.zip file to a folder on
your desktop (example, Desktop/MyApp), note that this
is only temporary.
2. Installing JRE
In this step we are going to
install the java runtime environment.
First, visit the java website:
http://www.oracle.com/technetwork/java/javase/downloads/jdk7-downloads-1880260.html
Now scroll down till you see
this window, accept the license agreement and download the version for your PC.
![]()
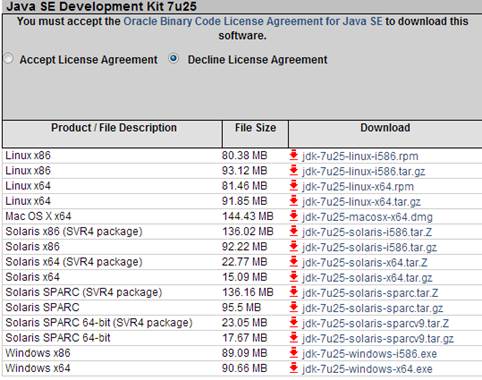
Download window
Follow the onscreen
installation instructions, make sure that you install everything except the
demos and samples.

Installation
options
After java has successfully been installed, we have to
add java to our path (if you are a Mac user, skip this).
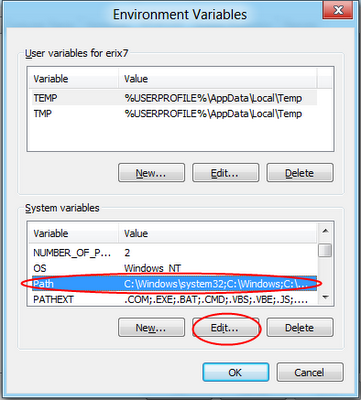
Open
path
Windows 7
1. Select Computer from the Start menu
2. Choose System Properties from the context menu
3. Click Advanced system settings > Advanced tab
4. Click on Environment Variables, under System
Variables, find PATH, and
click on it, if you do not have the PATH variable, you can add it.
5. Continue to step 6
Windows
XP
1.
Start -> Control Panel -> System -> Advanced
2. Click on Environment Variables, under System
Variables, find PATH, and click
on it, if you do not have the PATH variable, you can add it.
3. Continue to step 6
Windows
Vista
1.
Right click My Computer icon
2. Choose Properties from the context menu
3. Click Advanced tab (Advanced system settings link in
Vista)
4. Find PATH and click on it, if you do not have the PATH
variable, you can add it.
5. Continue to step 6
Windows (all)
6. Determine what you path to the java bin directory is,
this will probably be something like c:\program
files\java\jdk1.7.xxx\bin
It’s important you have the precise path.
7. Assuming there is already text in the variable value box, type a ; followed by your path, no spaces.
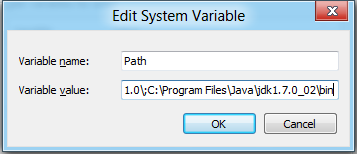
The path window
Linux
Follow the instructions on the Java website: http://www.java.com/en/download/help/path.xml
3. Installing ADT bundle
Go to http://downloads.puresoftware.org/files/android/adt-bundle/
1. Download the bundle, and unzip it to a good location
(example: My documents/development).
2. Now open the “Eclipse” folder inside the unzip location
(in the example: development), and run eclipse.exe (or similar on linux/mac)
3. After Eclipse has been loaded, go to window à
Android SDK manager.
4. Check the checkbox next to Android 4.4 (or up), Tools and Extras (Google Play Services) and
install the packages.
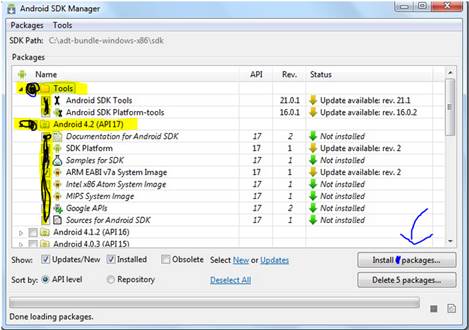
SDK manager (Image Outdated)
4. Preparing and Customizing
Now we are
done for importing our android project, adding our assets (icons and splash
screen) and we are ready to compile to a real app.
Note: if
you have already changed your assets, you only have to import.
Changing the assets
Note: You don’t need this step if you already have followed the steps in
the “Appearance” tab of your control panel.
1. First, go to the go to the Portal à your app à Appearance.
2. Follow the instruction carefully.
Adding Google Play Services (required)
1. Go to File > Import > Android / Existing Android
Code into Workspace > Next
2. Click Browse, Android browse to the location of
the Android SDK (or where you Extracted the ADT bundle) /extras/google/google_play_services/ and Confirm.
3. Make sure the Project is checked and click finish.
4. Now right click the google_play_services project > properties >
android and check Is Library, now click Ok.
Importing
1. Open eclipse and go to file à import
2. Choose: general à existing project into workspace and click Next.
3. Now choose, select root directory à browse and browse to the place
where you extracted you template (step 1).
4. Click select all (there should be
one thing selected now, since you only import one thing).
5. Check the “copy project into workspace” checkbox.
6. Click finish.
7. Now right click the SourceBaker Template project > properties >
android > Add and select google_play_services. Click Ok, Click Ok again.
Error solving
Note: You don’t need this step if you do not have any errors (project
with error looks like: ![]() ).
).
1. Make sure your project is selected
and go to project à clean, select your project and click clean.
2.
Right click your project à properties à Java compiler à Java compliance level
and change it to
1.7
3.
Right click your project à Android tools à Fix project
properties
4.
Right click your project à properties à Libraries à add external jar’s Browse to the extracted template
folder on your desktop à app à libs and select all the files
inside it (ca. 4). You might need to do step 1 again after you have did this.
5.
Google the errors that you are
getting (errors window).
6.
Get help on our FAQ.
7.
Contact us.
5.
Compiling
In this
step we are going to create an apk, and you can run
it on your phone!
1. Right click your project à export
2. Select android application and click
next
3. Follow the onscreen instructions to
create a keystore, this is only required once. Save
the keystore on a safe place, otherwise you won’t be
able to update your app.
4. Export the android application to a
location (desktop for example).
You can now
put this file: Xxx.apk
on your phone, you will be prompted to check the unknown sources checkbox if you have not checked it already, you
users won’t have to do this.
6. Publishing
In this
step we are going to publish your app to the Google Play store.
What you will need:
1. A valid Google account.
2. 25$ (one time, afterwards you can
submit unlimited apps).
3. A credit card.
4. Some screenshots.
 Browse to: https://play.google.com/apps/publish
and follow the onscreen instructions.
Browse to: https://play.google.com/apps/publish
and follow the onscreen instructions.
Click the +Add a new
app button, enter your apps name, and upload your .apk file.
Take your time to open all the tabs: APK, Store
Listing, Pricing and Distribution, etc.
And fill in at least all the required items.